Showing posts with label Recycle. Show all posts

14 April 2019

It’s been a while.....

Since Blogger removed their app to upload posts, I have been hesitant to use the online tool. It’s clunky and difficult to navigate on a tablet.... but I am going to try again :)

It’s been all about aprons this weekend - upcycled from tea towels, turned into useful things. My favourite Op Shop has small linen at 5 for $1, so mum and I stocked up on fancy pillow cases and I found some tea towels to test my theories on. I had seen some inspiration online using vintage tea towels, but they had additional width added to the sides, and I wanted to simplify even more. Just cut an armhole, add straps, and voila! 

So, I found a pattern online that had a variety of sizes - child, teen and adult - that I have been using as a guide as to where to cut. I also use the armhole curves to cut, although I could have drafted these myself, why should I, when someone else has already done it? Seems like double handling to me.....


Anyway, this is what I have done, so far....
CUPCAKES


This TT was one I bought for 25c.... I had originally planned to just cut armholes, but discovered it had a stain on it, just above the yellow cupcake. So, it was cut across as high as I could, spun the remaining piece around, and decided to use the embroidery as a pocket instead. So the original to hemmed edge became the bottom edge.


This is the first time I used the pattern pieces, and the instructions noted that it should have a binding on the raw edge. I used an Opped pillow case to make some bias strips, which I then put through my bias tape maker. 

Turned out pretty good for my first attempt ;)

AIRLIE BEACH


Another cute 25c TT, but once home, I discovered it had some marks on it:


They looked like burns, but on closer inspection, I think it was just dirt, as I could scrape it off with my fingernail. I didn’t want to wash it, so I needed to work around it..

Since the design was flipped, the first thing I did was cut it into two pieces. The plan was to flip one side over to make the top. So using the better side as the base, with a bit of manipulation, this is what
I had:


Ok, so not too bad. Stitch it up!!


Just did a double hem, no binding this time. Made up some straps, and done!

CHRISTMAS LINEN


This was an interesting one. Quite a large TT for 25c, so I was thinking I could get away with an adult size. 


Using the pattern piece and the TT in half, this was a winner for length, but not for width - but it was close. 


So, decided to continue with it as-is. There’s no rules, right?? ;)

Since the armhole is on the curve, I can take advantage of the bias and just do a double hem, add some straps, and done! 


 Tried a slightly different neck closure on this one. Single longer straps with a loop to tie onto. Works pretty well,  I think, and you only need three straps, not four. This one is s little long, but not too bad.


OH DEER


Another cute Christmas TT for 25c. Definitely kid sized ;)


I’m getting pretty good at these! Time to try something from the expensive pile!

LONDON DOUBLE DECKER


This one I bought with this project in mind. Cost me $2....


The actual quality of the TT was very poor. The rolled hems are dreadfully crooked, and I had to unpick the top edge in order to make it straight. 


OLD CAR


The final TT of the bunch. This one was $4 from another Op Shop. I wasn’t sure on this one to begin with, but took the plunge. It’s very large, ands fits the adult pattern plus some extra length.

So far, it’s had the armholes finished, just waiting on some straps to be made and attached.


A very productive weekend! ;) 

02 January 2017

More bags!!

Another couple of bags from preprinted designs. I wonder why people buy these thinking they are easier to use - none of them were square or on grain! What a PAIN!!

Anyway, these are now done.... ;)

This one has denim as the back, handles and facing. 


Th other one one was such an odd colour, I couldn't find anything in my stash to match.... I did, however, find some gold upholstery fabric (that frays like crazy!), but gives a bit if shine to an otherwise very flat print. 


You can see how shiny it is below -


I had to stitch it down to prevent it from bagging out.... It is nice and sturdy, since it is lined with curtain lining ;) There was a bit of extra on the side of this one. It looked like it was more of a wholecloth, rather than a single panel. I used the extra for some matching handles.


Not a bad start to 2017!! 


Now, what to do with these?? I have used the geese one before, but with the rounded corners, I'm stumped. The green one, I could put in some corner pieces, but in what colour? Thinking cap on.....

30 December 2016

Another bag, of course!

What can you do with pre-printed fabric panel that is supposed to be a cushion, but you don't want to make a cushion? Make a bag, of course!


This was given to me with a bunch of other panels. Whoever purchased this panel actually started to quilt it by hand, but it looks like the batting was too small and they gave up. I unpicked it all for a clean start....


I found a matching burgundy fabric to use for the back and handles, and decided to box out the corners using a strip piece technique, but still quilt the front (by machine, of course...)

Once the quilting was done, I cut the strips to the same length as the panel sides - in this case it is not completely square, so the sides and bottom strip were different lengths. I made them 5cm wide finished, with seam allowances at 1cm. Stitch to the seam allowance at the bottom. This will be stitched together later...


Then join the sides to the back, leaving the seam allowance at the base, same as the front


Then the base (leaving the seam allowance) -


Then you can stitch the ends to form the boxed corners :


I put a little fray stop on the corners, just to hold it a little more secure, since there is no lining (that is the dark patches that you can see in the corners)


So, this is how it will look from the right side :


So, this is where I am at, before handles and top....


The handles I made to finish at 5cm, but in hindsight they could have been thinner. Also cut a binding style top piece.

Stitch the side of the handles, turn and press. I like to put the seam down the centre and top stitch along the sides. Find the centre of the front and back, then space out the handles. I tend to space them at 5cm each side, but it doesn't really matter. No rules, right??


Baste in place, then add the binding piece. 


Turned out it will look like this :


However, I didn't like the proportions, so folded it over and top stitched on the seam. No mess, no overlocking to be seen ;) I also added a little button to the centre, for a little bling.


Another one bites the dust!!

11 December 2016

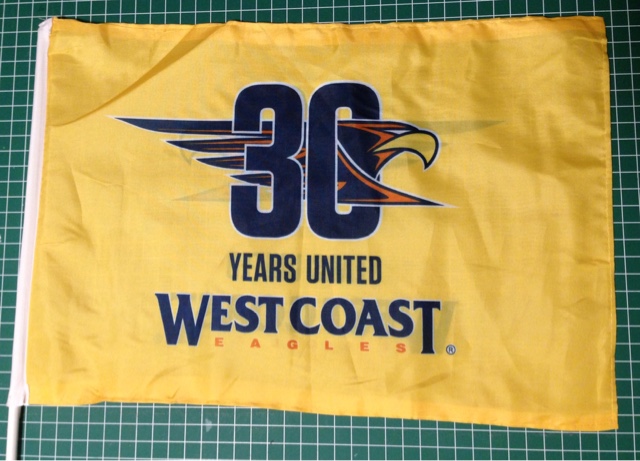
Make your own Flag Bag

So, the only plan I had with this was that I didn't want it lined afterwards, but rather to build it into its construction. Had to put my thinking cap on, but I think I pulled it off ;)


This is how I did it.....

The flag itself is made of a light weight, silky type fabric, which was double sided. I knew that this would not hold up well unless it had some support behind it. It would also help the design to stand out, since it is quite transparent.

Firstly, I removed the stick, which was only being held by a little hot glue. 


I then roughly trimmed off the seams, to get two pieces of fabric.


I wanted to keep as much width as possible, so after squaring off the top and bottom, I found the halfway point and was able to keep it at 42cm (40cm finished).

Next, I cut 2x strips of navy fabric (in this case 15cm wide) across the total width of my fabric. The bolt just happened to be 150cm wide, so two strips would cover both top, bottom and straps. 

I cut the strip to 82cm (since it is folded, I just needed to add seam allowance to one side, not both). At this stage, I thought I had taken a pic, but it appeared not :( Anyway, I marked halfway from the fold, and across the raw edge. This would become the self lined base.

I decided to further complicate the base to square off the corners. How could I do this?? Aha, I figured it out!!!


With the centre stitched, I folded the corners over and marked the depth of the corner. As it isn't very deep to start with (had I thought of this earlier, I would have made it wider - something to remember for next time!) so it was only 2.5cm from the end.


Mark both ends, both sides, and stitch from the sides to the centre stitching only.


It's a bit fiddly, but stick with me ;)


It will look like 4 separate little leaves. So hard to describe....


Trim the seams back, turn it through and you should get what looks like a boat-


From the other side - a self lined boxed corner. Amazing, hey?


On to the sides ;) I cut a matching lining piece from some curtain lining, with the fabric side out, rubbery side in.


I stitched the sides and the lining pieces into a tube. I also decided to reinforce the sides of the flag pieces, since it is so light weight.


Checking the finished width was 40cm, I stitched the sides to the base.


Then the lining to the other side...


This made the raw edges of the base fully enclosed by the sides. So far, so good!


I pressed the seams up, and ran a row of top stitching sound the bottom, for more support. Also, a row of stitching across the top to hold it all together. The flag itself frays really badly, so I tried to handle it as little as possible without stitching it.


Now for the top and straps!

Again, I cut it to 82cm and joined into a circle. Pressed the seams in and in half to make a jumbo binding.


There was enough leftover of the strips to use as the straps, so these got turned, pressed and top stitched. Finished width 4cm, but all the extra fabric did not get trimmed, but kept inside for extra support.


I considered putting the straps on the outside, but decided to put the inside, instead. 

So, I first stitched the binding piece to the front side if the bag, then positioned the straps on the inside and stitch in place. (No pic taken - I was getting excited that it was all working first time!)

Using loads of pins, I turned the facing to the wrong side, making sure the facing covers the existing stitching. From the front, I ran a row of stitching close to the seam, at this stage, avoiding the straps.


Another row of stitching added (could have included the strap at this stage, but didn't. If I was to do this again, I would stitch it down at this point)

Turn up the strap, and run a row of top stitching around the top, catching the straps down. 


Turn right side out, and we are done!!


Lots of technical stuff in this one, but if all seams are accurate, it should be a breeze ;)