Showing posts with label bag. Show all posts

07 August 2018

Cushion Upcycle

A while ago, mum gave me a cushion cover. It has a cute printed owl wearing a bowtie on the front. The fabric is quite sturdy, like a canvas, so it will make a great bag :)


After unpicking the cushion, I needed to decide what to do with the back. As a cushion, it had an envelope opening at the back with large buttons and buttonholes as closures. I originally was just going to stitch the pieces together and leave the buttons there for decoration. After unpicking, I decided that I would make it into a pocket...… more on that later.....


I had a plan - add a side wall. I auditioned a couple of different fabrics, but thought the stars would be the best match for the stripes:


I then cut the strips to fit the sides, and added some curtain lining to give it some oomph. The fabric itself was quite light, so it needed some extra strength to match the heavier canvas type fabric of the owl. I also ran a row of stitching down the sides to hold fabric and backing together.
 
Stitch each side to the front and back (minus the seam allowance), then the corners can be stitched.
 
Straps added under a facing, turn it out, and job done!
Finished size approx. 53cm x 53cm excluding the straps


Note the rear pocket :) I used the original lower piece and buttons, and made a feature out of some blue cord. Not as successful, but made it interesting..... 

08 October 2017

More flag bags!

Gosh, am I glad I wrote a tutorial last time! I had another 2x flags given to me, and it was great to be able to refer back to my own pictures 😊


This time they were sponsorship flags, hence they are orange, rather than the blue/yellow  combo of the other ones. These were also a different quality of fabric, and had a liner inside to stop the transparency.

The first one I trimmed off the edges, as I did for the first one, but didn't realise that it was actually printed in one piece and folded over, so the second one I unpicked. This made for a bigger bag, since there was much less waste.


I also took some extra pics for the original tutorial, since there seemed to be a chunk that was a bit vague, even for me, and I created it!! 😳

Anyway, they both turned out great! One has been claimed by the Boy, so thereis no chance getting this one back, but it still leaves a second one that I can try and get rid of...

I think I made the straps too short on the smaller one, but it would be large enough to carry some water and a jumper, in case of a change in the weather....

02 January 2017

More bags!!

Another couple of bags from preprinted designs. I wonder why people buy these thinking they are easier to use - none of them were square or on grain! What a PAIN!!

Anyway, these are now done.... ;)

This one has denim as the back, handles and facing. 


Th other one one was such an odd colour, I couldn't find anything in my stash to match.... I did, however, find some gold upholstery fabric (that frays like crazy!), but gives a bit if shine to an otherwise very flat print. 


You can see how shiny it is below -


I had to stitch it down to prevent it from bagging out.... It is nice and sturdy, since it is lined with curtain lining ;) There was a bit of extra on the side of this one. It looked like it was more of a wholecloth, rather than a single panel. I used the extra for some matching handles.


Not a bad start to 2017!! 


Now, what to do with these?? I have used the geese one before, but with the rounded corners, I'm stumped. The green one, I could put in some corner pieces, but in what colour? Thinking cap on.....

30 December 2016

Another bag, of course!

What can you do with pre-printed fabric panel that is supposed to be a cushion, but you don't want to make a cushion? Make a bag, of course!


This was given to me with a bunch of other panels. Whoever purchased this panel actually started to quilt it by hand, but it looks like the batting was too small and they gave up. I unpicked it all for a clean start....


I found a matching burgundy fabric to use for the back and handles, and decided to box out the corners using a strip piece technique, but still quilt the front (by machine, of course...)

Once the quilting was done, I cut the strips to the same length as the panel sides - in this case it is not completely square, so the sides and bottom strip were different lengths. I made them 5cm wide finished, with seam allowances at 1cm. Stitch to the seam allowance at the bottom. This will be stitched together later...


Then join the sides to the back, leaving the seam allowance at the base, same as the front


Then the base (leaving the seam allowance) -


Then you can stitch the ends to form the boxed corners :


I put a little fray stop on the corners, just to hold it a little more secure, since there is no lining (that is the dark patches that you can see in the corners)


So, this is how it will look from the right side :


So, this is where I am at, before handles and top....


The handles I made to finish at 5cm, but in hindsight they could have been thinner. Also cut a binding style top piece.

Stitch the side of the handles, turn and press. I like to put the seam down the centre and top stitch along the sides. Find the centre of the front and back, then space out the handles. I tend to space them at 5cm each side, but it doesn't really matter. No rules, right??


Baste in place, then add the binding piece. 


Turned out it will look like this :


However, I didn't like the proportions, so folded it over and top stitched on the seam. No mess, no overlocking to be seen ;) I also added a little button to the centre, for a little bling.


Another one bites the dust!!

11 December 2016

Make your own Flag Bag

So, the only plan I had with this was that I didn't want it lined afterwards, but rather to build it into its construction. Had to put my thinking cap on, but I think I pulled it off ;)


This is how I did it.....

The flag itself is made of a light weight, silky type fabric, which was double sided. I knew that this would not hold up well unless it had some support behind it. It would also help the design to stand out, since it is quite transparent.

Firstly, I removed the stick, which was only being held by a little hot glue. 


I then roughly trimmed off the seams, to get two pieces of fabric.


I wanted to keep as much width as possible, so after squaring off the top and bottom, I found the halfway point and was able to keep it at 42cm (40cm finished).

Next, I cut 2x strips of navy fabric (in this case 15cm wide) across the total width of my fabric. The bolt just happened to be 150cm wide, so two strips would cover both top, bottom and straps. 

I cut the strip to 82cm (since it is folded, I just needed to add seam allowance to one side, not both). At this stage, I thought I had taken a pic, but it appeared not :( Anyway, I marked halfway from the fold, and across the raw edge. This would become the self lined base.

I decided to further complicate the base to square off the corners. How could I do this?? Aha, I figured it out!!!


With the centre stitched, I folded the corners over and marked the depth of the corner. As it isn't very deep to start with (had I thought of this earlier, I would have made it wider - something to remember for next time!) so it was only 2.5cm from the end.


Mark both ends, both sides, and stitch from the sides to the centre stitching only.


It's a bit fiddly, but stick with me ;)


It will look like 4 separate little leaves. So hard to describe....


Trim the seams back, turn it through and you should get what looks like a boat-


From the other side - a self lined boxed corner. Amazing, hey?


On to the sides ;) I cut a matching lining piece from some curtain lining, with the fabric side out, rubbery side in.


I stitched the sides and the lining pieces into a tube. I also decided to reinforce the sides of the flag pieces, since it is so light weight.


Checking the finished width was 40cm, I stitched the sides to the base.


Then the lining to the other side...


This made the raw edges of the base fully enclosed by the sides. So far, so good!


I pressed the seams up, and ran a row of top stitching sound the bottom, for more support. Also, a row of stitching across the top to hold it all together. The flag itself frays really badly, so I tried to handle it as little as possible without stitching it.


Now for the top and straps!

Again, I cut it to 82cm and joined into a circle. Pressed the seams in and in half to make a jumbo binding.


There was enough leftover of the strips to use as the straps, so these got turned, pressed and top stitched. Finished width 4cm, but all the extra fabric did not get trimmed, but kept inside for extra support.


I considered putting the straps on the outside, but decided to put the inside, instead. 

So, I first stitched the binding piece to the front side if the bag, then positioned the straps on the inside and stitch in place. (No pic taken - I was getting excited that it was all working first time!)

Using loads of pins, I turned the facing to the wrong side, making sure the facing covers the existing stitching. From the front, I ran a row of stitching close to the seam, at this stage, avoiding the straps.


Another row of stitching added (could have included the strap at this stage, but didn't. If I was to do this again, I would stitch it down at this point)

Turn up the strap, and run a row of top stitching around the top, catching the straps down. 


Turn right side out, and we are done!!


Lots of technical stuff in this one, but if all seams are accurate, it should be a breeze ;)

04 December 2016

WCE Flag bag

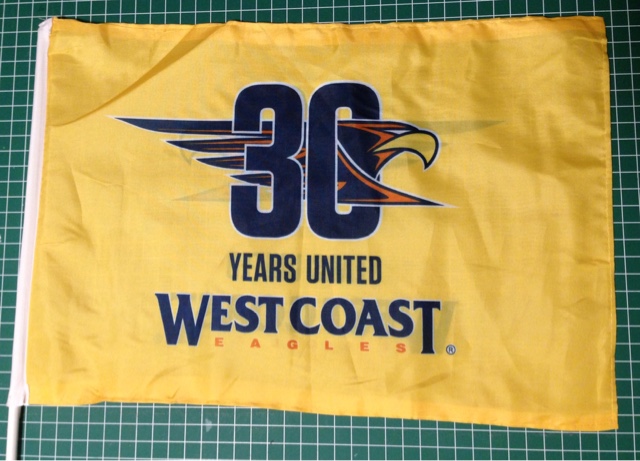
This year marked the 30th anniversary if the West Coast Eagles footy club, and all attendees to this particular game got a commemorative flag. 

What better way to celebrate this achievement than to turn it into a bag?? That way you can celebrate at every game!


Tutorial to follow.... Finished size 40cm x 40cm

09 April 2016

Another finish, another bag!

Mums been doing some cleaning up, and found a fabric panel I had given her her to add a machine embroidered design to. Thing is, I have her machine here to play with, so it was passed back to me to finish. 

Blogged back in October 2013 : http://danaspageofstuff.blogspot.com.au/2013/10/another-bag.html

Ages back I bought a bag of random scraps, and in amongst the pieces was this panel. It looks like it was going to be a cot bumper or something like that? Anyway, I thought it was missing something, so after looking through the book that came with the machine, I found a hot air balloon that might work.

After doing a sample, I went ahead with the real thing! Turned out a little tight, but worked out ok...

I remember, at the time, buying some (what I thought was) matching fabric, but, looking with fresh eyes it was not close enough to be passable. So it needed to be contrast instead. 

I also added some sequins to the trees to liven them up a bit. I had thought about beads, but they were too intrusive, and we're catching on everything, so sequins were the next best thing.


This is what I ended up with in the end:


It's heaps bigger than I was expecting! I decided to line it to give it some body, but found that the sides kept collapsing, so I decided to add some buttons at hold it together. Probably should have put some stabiliser into the navy top panel, as it's pretty soft, but it will make a good beach bag or similar. ;)