Showing posts with label bear. Show all posts

18 October 2014

There's a bear in there!!

A couple of Doll Club meetings ago, I was given a box with a half-made bear inside. It was hand stitched, but there was no way I was going to continue this way! I'm a machine user, and only hand stitch out of necessity. I machine stitched over the existing hand sewing, for structural stability - just in case....

His head wasn't yet attached, and since he had no instructions with him, I just had to guess on things such as where to put the eyes and ears, as well as arms and leg positions. Mum had some safety eyes and noses, and I am happy with my final choices. His ears are a bit wonky, but let's call that character, OK?? Not sure if he was supposed to be jointed at the neck, but it fitted onto the body, so I stitched them together. It worked quite well, I think...

I didn't realise quite how big he was until I started stuffing! He's around 60cm tall, and is made from some kind of short acrylic fur that mimmicks sheepskin. A fluffy bear, he is not... ☺️ There must have been a reason for this fabric choice, but goodness knows what it was! It's only redeeming feature is its ability to hide all my hand stitching....

Anyway, here he is! 


He is going back to his original owner. I hope she loves how he turned out! 

10 August 2013

Woohoo!! I am DONE!!

Finished the final bits on the bride bear, so I am calling her DONE!!


No idea what the veil is supposed to look like, so I had to "wing it", but I think it's cute. I added some beading to tie in with the bodice, even though it will probably never be seen. And the garter is just some lace... Simples!!


Box it, deliver it, DONE!!

Back to my own stuff. Now, what to do first??

03 August 2013

I'm over it!!

I am sick of looking at these darn bears!! But at least they are 99% done....

Everything is permanently attached to the bear so it won't fall off, beading is done, shoes done, underthings done - as far as I am concerned, the groom is DONE, just some tiny bits to be finished on the bride, including the veil....


The actual bride requested that the bride bear have hair. I am really not sure about this, but I found a hairpiece at the market cheap so tomorrow I will buy it and see how it looks. Even if it looks awful, I can reuse it on one of my other dolls!

Pics are pretty ordinary, better ones to come...


02 June 2013

Happy WA Day!!

So, today is a public holiday for WA Day (although it is still Foundation Day to me...) and I have been on my own since the Boy went to Kalgoorlie on Friday. I had plenty of alone time to focus on what needs to be finished. Top of the list, the bears!!


I spend a great deal of Saturday on the bodice, and the skirt Sunday morning. Not too pleased with the result but it will do the job! Still need to add the beads, but it will be OK in the end. Shoes are an issue also - not sure where to go with them...


Also found a tie pattern for toys (its awesome!!) so groom bear now has a tie in Dusty Rose, the requested bridesmaid colour. Just need to find the remaining black fabric and test out some pockets and he is DONE! I will need to permanently attach the shoes so they don't fall off when they are on the front if the Limo!


Now that the Boy is back from Kal, the house has been like grand central station!! 3 visitors today, so no more progress! Think I need to go back to work for a rest..... 


25 April 2013

Bridal bears - the Groom

I think I've mentioned before that I promised to dress some bears for my cousin who's getting married in September, but as yet had not been motivated. Can't put it off any longer, so here goes!!

I thought I had better start with the Groom, since his coat was going to be the most complicated part. But how??

Brainwave!! The bears are about the same size as a CPK, so I hunted through my patterns and found a basic shirt and pants, which fit perfectly!

Having not made a "proper" jacket since I was at TAFE, I got my old trusty reference book out and got to drafting the perfect coat with notched collar. I am not sure exactly what the groom is wearing, only "black suit and white shirt", so I've taken a lot if liberties with the style. Still deciding if pockets will be added, but that can be done later (I have a couple of months up my sleeve...)

As I decided that this will not be removable, and I have not neatened the internal seams, only those that will be seen. With this in mind, there was no point making a full bulky shirt, so I made a kind of "dickie" (fake front), which looks like its full but really isn't. To further help the illusion, I put a ring of white around the cuff of the coat. I used that same shirt pattern as the coat, only redrafted the collar and neckline. Still unsure of colours for his tie, but I'm sure the bride will tell me in time *fingers crossed*

Since I still need access to the shirt, I have not yet attached the buttons, but that will only take a short amount of time to complete when the time comes, so please excuse the pins holding them on!

The bride is next. I have a pic to go on for her, but that doesn't make her less of a challenge! I hate working with satin.... LOL!!


30 December 2012

TRG bear gets an upgrade..

I had been hunting a small-ish gun ever since TRG bear was created. I knew he needed more than just his camo pyjamas, and I found one at our local market!

The gun is actually a keyring, and not technically the correct gun, but who's looking that closely?

The plan was to make a thigh holster. I just used elastic for the waist and leg strap, and leather for the holster. Again, not technically correct, but the gun fits well and it looks cute!

I also had the idea of making a balaclava. I don't knit, and I have no idea how I would crochet one, so it's gotta be fabric! I made one out of a textured knit, but after walking past it for a day, I decided it was not the right colour, so I remade it in a darker green. Much better!

Finally, he needed some camo netting! How can you hide in the scrub without the right camouflage? After studying some pics online, I worked out the right pattern, then I cut on all the lines, gave it a little rinse in some water to fluff it up, and voila!

Let's go fight some bad guys!!


17 June 2012

DOCS Ted upgrade

DOCS Ted has had a minor upgrade.....

He was a hit at work, however the first comment was "he needs a belt". How could I refuse a request like that??? So, between mum and myself we threw around some ideas, and came up with 2 possibilities : a small cat collar, or a watch band.

Working from those ideas, and since it was the weekend, I went to our local market and having no success on the pet collar, managed to spot a jewellery shop. After explaining what I was looking for, the lady had the PERFECT little watch band buckle - and she let me have it for FREE!! Such a nice lady!! Its a bit hard to see in the pic, but I used a textured tape to make the belt, and added a couple of belt loops for good measure. I may remove the back part of the belt and just fix it at the sides at a later date. I just wants to curl up at the back, and looks a bit ordinary. The tape I used was pretty light - it is meant to be used for stopping seams from stretching on knit fabrics, like the shoulder seams. It was the perfect width, and I even chose it before I found the watch buckle. Coincidence or good luck?? Who cares, it worked!! LOL!!

He also got a V-neck vest, since he was drowning in BEIGE......... Of course, I don't knit, but I found this heavily textured rib in my stash, and it turned out brilliantly - first time!!

Not the best pics - sorry! I was in such a rush to get it done and back to work that I just pointed my phone at him, but you get the general idea! I will try and get some better shots of the whole gang some time this week........


Next project is in the works, too. I was lying in bed this morning thinking about Christmas in July, and how I still have a box of scraps left over from my last Christmas doll quilt. Also, the Canning Show schedule will be out soon, and I have nothing completed yet to go in it!! So I started google-ing Christmas Table Runner, and found a few interesting designs, but then, as if on cue, I was playing on my Flipboard app and found the perfect pattern!! And here it is....

ET phone home

Big thanks to lilysquilts.blogspot.com.au for her free template. I have printed out the pattern pieces and I already have the Christmas prints cut into scraps - just need to decide if I am going to do random triangles or actually structure the traditional red/green/white scenario. Knowing me and structure, I will probably go with the random effect. I have soooo many Christmas print fabrics I could probably make it without repeating one single design! Almost......

Anyway, since its really cold and wintery here in Perth, it may just be an excuse to put on the iron for a bit of paper piecing next weekend. I have done little lately for my own benefit, unless you count a few baby bags for Santas. Time for some sewing just for me. Just because.......

04 June 2012

DOCS Bear

Finally got some sewing time! This time and the Department of Corrections Services got their own bear. Basically, it's beige on beige, but maybe he will get a black vest later on?

He has the same shirt pattern as the other bears, but his trousers are all new. They have a flat front and elastic back. His shirt also has proper buttonholes and buttons!!

The girls should be happy with him... I hope....


14 May 2012

Ted v2.0

Ted's had an upgrade! LOL!!

Thanks to Mums new embroidery machine, Ted now officially works for Fire and Rescue! The text is only 1cm high. So cute!

Ted also now has a helmet, although not technically the correct style but it's hard when he has a tiny head and large snout! I started out with a plastic ball cut to the right shape and I used a plastic 2L soft drink container for the visor. Glue, peg and elastic, and voila!


25 April 2012

Western Power bear...

So the next contract I decided to dress from work was Western Power, although it could easily be anything like mining or mechanical, etc......

I used the same shirt pattern that seems to fit really well (see Accountant bear) but then attach it to a pair of trousers to make a kind of boiler suit. I took a diagram of an actual suit from work and used that as a guide to where to put the silver tape, colours, etc.

I had a literal laugh out loud moment as soon as I turned this outfit right side out. I thought it was HILARIOUS!! It turned out just as I had pictured in my head!!

Very few accessories to be added to this one, besides maybe a name tag and boots......


23 April 2012

More mini bags of fun!!

A trio of  mini bags
Just made another mini bag, and taken some better shots for the future tute. It's a better contrast so you can see the stitching better.

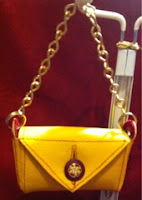
This time I used a yellow vinyl on the outside and red upholstery velvet in the inside. Also made a couple of construction changes... Oh, and I added some chain handles!
vinyl outside, fur inside


Fur outside, vinyl inside
vinyl outside, red velvet inside
red velvet inside


21 April 2012

Bear satchel...

So, accountant bear (affectionately named Doris!) came home this weekend for a couple of upgrades. Firstly, let me just say the girls at work LOVE her, and are frantically hunting around for accessories.... hence the upgrades!

A bright red flower was supplied as a brooch, plus a cute little bow for her hair. Now, she just needs shoes, glasses and a briefcase and she is complete!! I can't do shoes (although I DID try!) or glasses, but I had made a satchel in the past that was quite successful. I will write up a quick tutorial when I get on the big puter, since blogger for iPad doesn't allow for inserting pictures where you want them, it just dumps them all at the bottom... You hearing me, Blogger?? Rant over....

Anyway, here is the new and slightly improved Doris, the accounts department bear....


15 April 2012

Accountant Bear...

Request number 2 - add a bear for the Accounts Department...
Now, how stereotypical should I be?? Glasses, calculator, suit??? Yep, all of the above!!

Version 1 was not too successful. Bears are hard to dress, especially these ones with bulging legs and big tummies! I tried to make a collared jacket with plain shirt and scarf. Although the skirt was successful, the shirt and jacket was not. The sleeves were far too full at the top, and the body just plain the wrong shape! Plus the shirt was far too casual...

FAIL!!


Version 2 - jacket collar removed and collar added to undershirt. Much better result! Ended up using the original skirt, made a new jacket and shirt, plus added some "underthings" for modesty. I think I'll leave the accessories to them....

SUCCESS!!


(She is wearing some borrowed CPK lace up shoes.The girls can arrange to get their own...)


02 April 2012

New job, new challenge..


My new job is AWESOME!!

Not only am I out of the supermarket game, I get to work with FABRIC and CLOTHES all day!! Not so exciting to most people, however I feel like this is the perfect job for me!! Let me explain a little about what is involved...

We fit safety clothes and uniforms to agencies such as Police and Fire departments, electricity providers and Transport and prison workers. My main focus is the Fire Department, or FESA (Fire and Emergency Services Authority of WA), or in Aussie slang, the Fireys.

As part of my job, I fit individuals with their fire fighting gear. There are strict requirements as to the fitting of these garments, such as sleeve and leg lengths (we don't want them to burn their arms or legs!!) as well as allowing air flow around the body to keep them cool. I get to see a lot of different people every day, as well as talk to them on the phone, plus data entry and a little warehousing, too!

So, as I collect dolls and toys, and love to make doll clothes, the following challenge was issued - dress a bear like a Fire Fighter! Sounds easy, right?? Well, no.......

I do have an advantage, however. I can access the design drawings to use as a starting point. My intention was to create an exact replica in small scale, but as many will agree, this is NOT easy. I even bought miniature clips for the braces with the intention of using them but discovered very early on that this was not going to work. Too much bulk was created under the jacket and besides, Ted isn't going to need to get undressed very often, so I simplified a bit (read - a LOT!!). I was also going to use real reflective tape, but I couldn't find any by the metre, only full rolls, so I settled on a silver tape from the local hardware store cut to 2cm widths....


I started with a CPK pattern as a base (Butterick 3932), since one of them already has a peter pan style collar and I hate drafting these from scratch!! Turned out that there was little that needed to be modified in the body, just a little shortening, and the sleeves needed to be made more fitted. Generally, the CPK sleeves are just rectangles, so I added a sleeve head and a bit of length to create a more fitted sleeve. I should have straightened the body a bit - removed the hem curves - but I am NOT doing it again just for that!! It worked so well the first time, I don't think I will tempt fate again!! The trousers were from the same pattern, but made a bit narrower in the side seam and deeper in the crotch. I did actually make a toile to check the fit before cutting into my fabric. I'm so glad I did, or this could have been a "throw-it-in-the-corner-and-never-finish-it" kinda day. But, in a rare show of skill, it actually worked first time!! So here is my final results....

I did not make the bear - he was $1 from the Salvo's. He has a bit of a wonky face! His boots are oversized ones from a Doofles, which I painted black. They help Ted to stand on his own, and look cute too!! Next challenge is a safety helmet.... Hmmmmm......

Front, all zipped up
Front, showing velcro flap over zipper
Front with coat open
Front fully open, showing trousers and suspenders
Front, trouser opening
Front showing suspenders and hem binding
Back, trousers
Back, coat and trousers together