Supplies:
Cardboard tin - coffee, custard, gravy, etc
Styrofoam balls
Paint
Plain paper
Spray paint -yellow and black
Glue - PVA works fine
Dowell
Screws
Denim
Iron-on Vilene
Ribbon
Googly eyes
Plastic tube to fit eyes
Cardstock
Split pins
Coated wire
Pens and pencils
Assorted tools -screwdriver, drill, hammer, cutters
First, make sure your ball is going to fit the tin. You can do this by placing the ball in the neck of the tin.
Cut the ball in half - I use an old serrated bread knife - and glue it to the BOTTOM of the tin.
Cover the ball with layers of glue. The tin, in this case, is quite dark, so I painted a layer of white to lighten it before covering with paper, which was measured to fit with a small overlap. Make sure any bubbles are removed as you go.
Once it is dry, cover with two light layers of spray paint. Allow to dry completely between coats. The paper layer on the body absorbs most of the first layer. The second creates the glossy appearance. Be prepared for a bit of a lingering odour, but this will disperse once dry.
While this is drying, you can go ahead with making the legs. Cut the dowell to length, and mark the centre of each end. I punched the centre with a nail, and used my screws to make the holes. You can pre-drill if necessary. Also, mark the location of the legs on the lid and make the holes.
Test screw the legs in place.
To make the shoes, take a smaller ball and cut in half. Trim each half by cutting a bit off each side.
Drill a hole in the other end of the dowell to accommodate a length of bamboo skewer. Glue in place.
Cover the styrofoam with layers of glue and allow to dry. This can then be sprayed with paint and set aside. (I used a chunk of pool noodle and bamboo skewers to hold up my shoes. Pool noodles are the most useful things!! And cheap, too. :) )
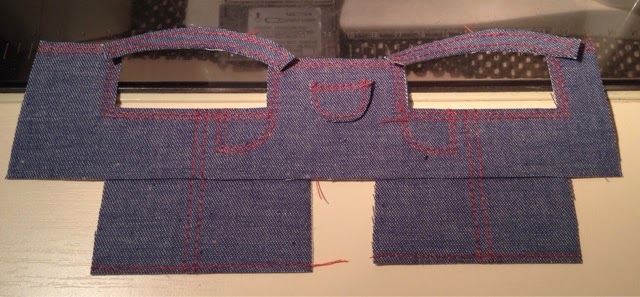
Trace pattern for overalls onto iron-on vilene. Do not cut out! At this point you can also cut a strip of vilene wide enough for the legs.
Add the stitching details to the trousers.
Trim on the lines...
... and glue in place on the base of the tin. Cut the strip to fit onto the legs. Trim if necessary.
Put glue on the end of the legs and secure feet in place.
Make the goggles by trimming tubing to the depth required. Paint or trim with foil. Allow to dry and glue eyes in place from the back. Glue ribbon trim in place along edge of tin and glue on the eye/eyes.
Choose the hair type, then make the holes in the head for the hair strands. Insert the lengths of wire and mold them to fit. Once happy, glue in place.
Draw mouth design onto scrap paper. Colour with pens and pencils. Trim and glue into place. I made several types, and tend to freehand draw a bunch and see which one suits best. In this case, he has a toothy smile
I painted the top of the split pins to blend them in better. I have done this on before on Dorothy, and simply sprayed the tops with paint after an undercoat of gesso.
Trace the arms onto some cardstock, then lightly sprayed on both sides. You can see the bubbles where my paint was a little thick. My bad! It's still ok on the other side... ;)
Once dry, cut out the shapes. Paint the gloves with black paint. Mark the holes and put through the pins. Given the narrow piece, I trimmed the pin once it was flattened out, so it cannot be seen from the front.
Pop them onto the body with the split pins, and open the pins as flat as possible inside the tin. Put the legs back on....
And that's it!! Minion number two is done!!


