Showing posts with label recycled. Show all posts

04 December 2016

WCE Flag bag

This year marked the 30th anniversary if the West Coast Eagles footy club, and all attendees to this particular game got a commemorative flag. 

What better way to celebrate this achievement than to turn it into a bag?? That way you can celebrate at every game!


Tutorial to follow.... Finished size 40cm x 40cm

30 January 2016

TP roll houses...

I saw some toilet paper roll bird houses recently, and thought I would give it a go! They are meant to be Christmas ornaments, but would look cute any time of year......

Although the one I originally saw was covered in felt....... http://mmmcrafts.blogspot.com.au/2016/01/handmade-gifts-2015-make-little.html 


So, this is my first attempt.... I was going to put all sorts of fancy stuff on the outside, but decided to go with a simple tree.


I didn't shorten my roll, but these are just experiments, right?

Second one, I used the rest of my circle to make the roof, and it ended up like a tiki hut, so I used markers to make it look like reeds. The tops of plastic bottles fit exactly into the TP roll, so I used a matching blue one to fill in the gap! Handy!!


I have not embellished this at all, yet, just seeing where it is going to take me....

The last one is an experiment with doors, not Windows. I cut these from the base, and experimented with manipulating the top. I just cut strips down to the same depth, and twisted them to form the spiral. Not too hard, but LOTS of glue required! I also added the bell, but felt like you needed to see another angle, so I cut a window into the reverse side. Still deciding if the lid is too much, but it's there for now. The top is a button....


Something else I discovered, is that LED tealight candles fit perfectly inside the lid, which fits perfectly into the roll! What happens if I put one inside my little houses??


Cute, huh? More experiments required, methinks.....

I wonder if I can make some cutout covers for some tealights? Pass me the scissors!! ;)

By the way, all have a topcoat of Mod Podge, some matte, some gloss. Note, though, I used textas to embellish the roof and (originally) the tree after the colour coat, and the Mod Podge took it right off, like paint stripper! I had to redo the tree in paint, but have not yet sealed it. Not sure if it was the fault of the pens or the Mod Podge, but it's good to know on a project like this, than with something I paid good money for... Gotta love a free, recycled project!!

08 August 2015

More bread tag robots!

I have tried some more bread tag robots, this time with some proper tools! It's amazing how much easier it is to work when you have the right tool for the job. I had seen a pack of 5 assorted jewellery tools at Spotlight complete in a zip up pouch for $15, but I much preferred paying 30% less with a discount voucher..... ;)

Anyway, buying head pins was expensive, so I bought a roll of beading wire instead, and made them with loops. I think they give a bit of interest to the front, so adding the heart may be too much?


I also tried using the one that I spray painted, and it looks pretty good an breaks up all the whiteness.


So I also thought I would try the loose leg style, and I think I like it more this time around, as they are longer, and the shoulders aren't so pointy. Basically, I just cut 2 tags in half, but the leg ones need to be trimmed a bit around the join and flipped around to make feet. 


The holes are drilled with the smalles bit I have, except for the neck, as the jump ring is thicker so won't go through. Mo measuring, just eyeball and drill. Simple!! 


Not a bad result, if I do say so myself :) And much more secure than the head pins, so the joints are tighter....


They don't look so great from the back, though, so I will consider painting them, at least in primer, to hide the dates that are printed on them. That will give a much nicer look to the finished pieces. Not sure how to fully remove the inside of the key, either. It's such a small space to work with, and you can't get cutters all the way down to the base. I wonder if I should just keep the shank attached, rather than mangle up the back trying to remove it?


Anyway, I will definitely be painting some more tags as soon as the weather calms down a bit, but what to use for the hanging loop? I thought an earring hook, or maybe a keyring? Not sure it would survive that kind of abuse, as they are quite delicate. More thought required on that.....

01 August 2015

More Christmas recycling!

I'm on a recycled Christmas blitz! All the bits and pieces I have been hoarding are finally finding a use!!

Cue the unfinished items with big plans (lucky I still have a couple of months up my sleeve).

Just had the bathroom renovated, so no need to a shower curtain anymore. What do I do with all the rings? So far, a mini wreath, but I my also thinking dream catcher? This one is a bit of  red bias binding and some white ribbon, with a bell and a bow to top it off. I haven't finished this one yet, but it is very close. 


Next is this snowman variation. Before I painted the last one, I thought about glueing on some fleece. Not too successful, as you can see the red poking though, but once there is a face and buttons on, it should be ok. I can't remember what I used for the head, but the body is a milk bottle top. Maybe it's a coke bottle top? Not sure.....


Last year I made a gift out of cardboard and felt, I may make some more, but make them smaller. Maybe houses? Will have to see what happens...


So much inspiration at the moment, but not so much motivation. I'm gonna blame winter.... ;)

Christmas crafting, recycled style...

A cute little Snowman popped up on my FB feed using bottle tops. How could I resist giving it a go?? 
http://www.oneartsymama.com/2012/11/bottle-cap-snowman-ornaments.html

I had already started saving milk bottle tops for someone (can't remember now who?) and thought I could substitute with these instead. To get some variation in size, I used a milk bottle tops and the lid from a pasta sauce, but I also tried a coke bottle top. Another item I have been salvaging from the recycle bin are the used coffee pods, and thought this would make an awesome hat ;)

So, here is my interpretation of the Snowman. His head is a milk bottle top and his body is a lid from a glass jar. I painted it with my white spray sealer, first on the outside only, but went back and did the inside as well. I sealed it with some Mod Podge, and doubled up using it as the glue. I used some googly eyes and a faulty bead for his nose, some sequins for his mouth. Some beads make his buttons, although they look a little small... His scarf is made from felt, but I will raid my ribbon box next time.....


As a test, he isn't too bad. A few notes to remember, spray the backs FIRST, then the front, to stop the front being damaged. The head pin was causing the base to spin backwards when held up, so I used a bead to separate it a little from the rim of the lid, and used another between the "body" and "head" to give somewhere for the scarf to sit. I could use wire, to make it a bit softer? The hat has been deliberately placed at an angle, but could be straight on, if required. I could also glue two lids back-to-back, to give a more 3D effect, or even just his head?? May try that next time.... ;)

21 June 2015

Bread tag Robots

I was given a bag of multi coloured bread tags - you know, the little plastic clips that hold the end of a loaf of bread closed? What to do with them??

So, after a Google search, up popped a cute little robot http://www.michlinla.com/2011/04/slap-another-post-with-dueling-crafters.html Using him as inspiration, I did some experimenting....


Since my tags are a different shape to the one on the web, I tried a couple of variations. First, I put two tags together with a head pin in the middle (the green one), and tried many different ways for the arms, but I ended up glueing them in place because they kept falling behind the body. I had already saved a bunch of keyboard keys from another project that didn't happen, so had all the ingredients on hand, which is a plus... ;) I used a heart shaped confetti (also on hand) as an accent, like the original inspiration pic.

The second I tried a jump ring at the "waist". Still glued the arms in place and used a laptop key, rather than a keyboard key. It is way more fragile, but makes for a flatter piece. You can see where I put some holes a bit high and had to redo them so the jump rings would fit. She also has a little flower in her hair.


Third try, I turned the top tag around, and I like the results ;) More head pins, though, so I have to master turning the loops.... He looks like the sheriff, with his star badge on his chest :) 

The fourth guy looks a bit naked, but I have been experimenting with painting them... I trimmed the arms slightly differently (more like the original) and it helps with the arms moving around, (not sure I like the pointy shoulders, though...) and used the leftovers for some dangly feet. Gives an interesting effect, don't you think??

I think, out of all of them, the red one is my favourite. Yes, it needs 4x pins, but I think it is more stable and proportioned than the others. I definitely see more of these in my future! ;)

21 November 2014

How I made my Minion

Supplies:

Cardboard tin - coffee, custard, gravy, etc
Styrofoam balls
Paint
Plain paper
Spray paint -yellow and black
Glue - PVA works fine
Dowell
Screws
Denim
Iron-on Vilene 
Ribbon
Googly eyes
Plastic tube to fit eyes
Cardstock 
Split pins
Coated wire
Pens and pencils
Assorted tools -screwdriver, drill, hammer, cutters


First, make sure your ball is going to fit the tin. You can do this by placing the ball in the neck of the tin.


Cut the ball in half - I use an old serrated bread knife - and glue it to the BOTTOM of the tin.


Cover the ball with layers of glue. The tin, in this case, is quite dark, so I painted a layer of white to lighten it before covering with paper, which was measured to fit with a small overlap. Make sure any bubbles are removed as you go.


Once it is dry, cover with two light layers of spray paint. Allow to dry completely between coats. The paper layer on the body absorbs most of the first layer. The second creates the glossy appearance. Be prepared for a bit of a lingering odour, but this will disperse once dry.  


While this is drying, you can go ahead with making the legs. Cut the dowell to length, and mark the centre of each end. I punched the centre with a nail, and used my screws to make the holes. You can pre-drill if necessary. Also, mark the location of the legs on the lid and make the holes. 


Test screw the legs in place.


To make the shoes, take a smaller ball and cut in half. Trim each half by cutting a bit off each side.


Drill a hole in the other end of the dowell to accommodate a length of bamboo skewer. Glue in place.


Cover the styrofoam with layers of glue and allow to dry. This can then be sprayed with paint and set aside.  (I used a chunk of pool noodle and bamboo skewers to hold up my shoes. Pool noodles are the most useful things!! And cheap, too. :) )


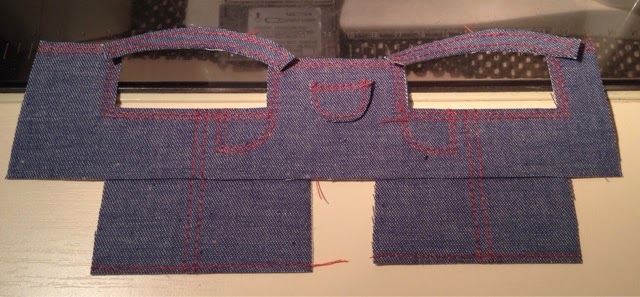
Trace pattern for overalls onto iron-on vilene. Do not cut out! At this point you can also cut a strip of vilene wide enough for the legs. 


Add the stitching details to the trousers.


Trim on the lines...


... and glue in place on the base of the tin. Cut the strip to fit onto the legs. Trim if necessary.


Put glue on the end of the legs and secure feet in place.


Make the goggles by trimming tubing to the depth required. Paint or trim with foil. Allow to dry and glue eyes in place from the back. Glue ribbon trim in place along edge of tin and glue on the eye/eyes.


Choose the hair type, then make the holes in the head for the hair strands. Insert the lengths of wire and mold them to fit. Once happy, glue in place.


Draw mouth design onto scrap paper. Colour with pens and pencils. Trim and glue into place. I made several types, and tend to freehand draw a bunch and see which one suits best. In this case, he has a toothy smile


I painted the top of the split pins to blend them in better. I have done this on before on Dorothy, and simply sprayed the tops with paint after an undercoat of gesso.


Trace the arms onto some cardstock, then lightly sprayed on both sides. You can see the bubbles where my paint was a little thick. My bad! It's still ok on the other side... ;)


Once dry, cut out the shapes. Paint the gloves with black paint. Mark the holes and put through the pins. Given the narrow piece, I trimmed the pin once it was flattened out, so it cannot be seen from the front.


Pop them onto the body with the split pins, and open the pins as flat as possible inside the tin. Put the legs back on....


And that's it!! Minion number two is done!!


They are a naughty pair.....


I have 4 more prepped for paint, so let's see where I go from here! :)