21 February 2016

Fabric book covers

Finally got to play with some fabric! It seems like ages since I turned Bernie on for something more than a cushion or bag!

I had been looking at making some fabric book covers for ages! I finally bought some spiral binders to experiment with. I also had a smaller notebook that was a tester....

First up, the smaller one - A5 size....


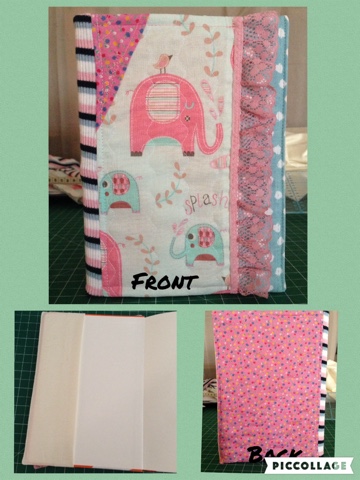
Used up bits that were given to me, mixed with some lace, and I think it turned out OK. This one was stitched onto some scrap batting with no lining, but the colour on the book was showing through so I had to cover it over. I also put a stretch fabric at the spine, which I thought would be a good idea, but it would need refining 'cause it made it too loose. It could work with a tighter knit, so I'm not disregarding the idea totally, just yet....

Second try, I used up a quilt block with a base inside, but no batting. 


Not too bad, but it ended up a little short and was curling the corners up at the front. To combat this, I trimmed the book a little bit, but that is cheating... ;) I feel like it's missing something, though...... (This book has been sold)

Third try, and this one is essentially a quilt sandwich, with envelope ends. Also experimented with stamps, with minimum success. I think this could be partly related to the fabric choice, rather than the technique itself.


Added a bookmark to this also. Finished a bit large for the book, but it's ok. 

Learned heaps for each one, so any others that I make should be perfect! Just kidding.... ;)

20 February 2016

TP Lighthouse tutorial

This is pretty much the entire equipment list - TP roll, template, top of choice, glue, paint and sealer.


I just used pegs to hold the template in place, and just cut it out. I made the template out of paper, based on the dimensions of the roll, and just tweaked it. Still a little crooked, but it's close enough...


I then used some Popsicle sticks to hold it while it dried. These happen to be bowed in the middle, so it helps hold the centre together - bowed sides in, hold with pegs.


Some paint, then Mod Podge. Don't forget to paint the windows and a door! Add the doorknob once the sealer dries...


Make the top, however you like. No rules, remember?


This piece just happened go fit perfectly into the top, but the circle works also, or a pod? 

I also put a Caffitaly pod in the base, to hide all the inside bits, but it doesn't fit the smaller roll, so I used another pod piece. 


They are really easy, and quick, too!! ;) 

13 February 2016

A little about coffee pods.....

The last craft fair I went to with mum, we saw a stall selling items made from Nespresso coffee pods - Beads n Pods - and they were AWESOME!! See them on Facebook https://www.facebook.com/BeadsnPods/?ref=ts&fref=ts

I am not a big coffee drinker, but there is a Nespresso machine at work that I have been "stealing" the used pods from to experiment with. However, I have discovered there are genuine and non-genuine pods. Genuine pods are made of aluminium and come in different colours for different flavours. Non-genuine ones are plastic. Don't get me wrong, I can still use them for something, just not the same way as first planned.

Another brand of pod is the one we have at home, called Caffitaly. These pods are bigger, but also have two plastic pieces inside. They are easy to dismantle, and I have found that these "inserts" are very useful in their own right. I have used them for many other projects, like necks, or bases for things. They are a great addition to my bits and pieces box ;)

So, these are some types that I have had from the machine at work (they provide the machine, but you have to supply your own pods) There are probably more out there, but these are all the ones I have found, so far......
A- non-gen V1
B- non-gen V2 - the closest in shape and size to the genuine pod
C- genuine Nespresso pod
D- Caffitaly pod, with two different inserts taken out. One is in the base, one in the top
E- non-gen V3
F- non-gen V4

All are plastic, EXCEPT the genuine Nespresso pod, which is light aluminium. You can see how the machine pierces the in three points on the Nespresso, but the Caffitaly only has the one, in the point. 

The other main difference I can see, is on the other side.

On the left is the Nespresso, the right is the Caffitaly. You can see the difference in size and production method of the two side by side. (Note that the Caffitaly one here has not been used to make a coffee...yet.)


It should be noted that coffee pods are very bad for the environment, so any chance to stop them going into landfill has got to be a bonus, although Nespresso do have recycling points around the place. http://www.nespresso.com/ecolaboration/au/en/recycling.html
 
They can be great for hats on small projects (I have used one for a snowman ornament) or bells, put two together with some rice inside for maracas or tops for lighthouses, or whatever else you can think of. You just have to think outside the box! :)

05 February 2016

TP roll lighthouses...

So, moving on from standard straight sided roll, what would happen if cut it up the side, and make a cone shape? A lighthouse... or 4!


Started by trying to cut out windows and door, but didn't like the result a whole lot. It's very difficult to get a clean cut, as the quality of the cardboard is not that great, for obvious reasons. Also, had to paint the inside black to stop seeing cardboard inside. The top is a clear coffee pod with a circle taken out of a milk top, a bead for the "light", held together with some beading wire. I threaded it through from underneath, secured with a sequin, and put a loop at the top to secure it. Like the stripes, though ;)

Second time around, I had made the pattern to get the biggest cone shape, so it can be replicated. Same technique for the top, but swirley paint this time.

Third time, more stripes, but change of top, with a pod insert inside the clear pod, and another pod in the base. (The pic explains it better)


Lastly, I simplified a lot, made it mainly white, used a funky pod on top with beads on top of that, and pod insert as a base. This tp roll is a different brand, and is smaller than the others, so fitted differently.

All have been sealed in Mod Podge, with a bead as a door knob. 

Experimented with several other tops, and all would work. There are no rules, right? It's my interpretation of a fantasy lighthouse...... ;)


Very easy to do, much improvement to be done, but I need to get my fabric fix :) It's been a while....

But first, a tute could be in order? Stay tuned....