Showing posts with label tutorial. Show all posts

11 December 2016

Make your own Flag Bag

So, the only plan I had with this was that I didn't want it lined afterwards, but rather to build it into its construction. Had to put my thinking cap on, but I think I pulled it off ;)


This is how I did it.....

The flag itself is made of a light weight, silky type fabric, which was double sided. I knew that this would not hold up well unless it had some support behind it. It would also help the design to stand out, since it is quite transparent.

Firstly, I removed the stick, which was only being held by a little hot glue. 
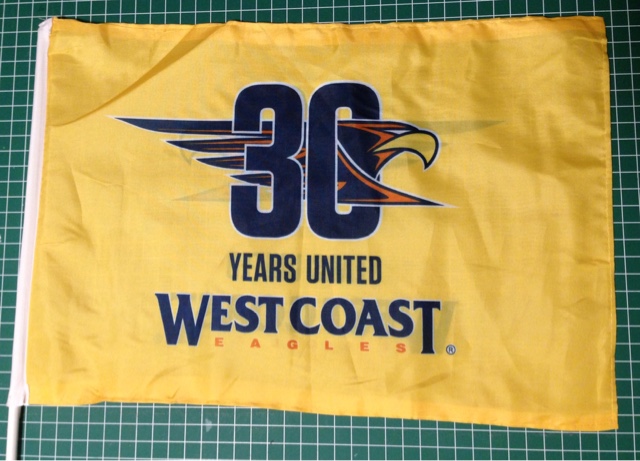

I then roughly trimmed off the seams, to get two pieces of fabric.


I wanted to keep as much width as possible, so after squaring off the top and bottom, I found the halfway point and was able to keep it at 42cm (40cm finished).

Next, I cut 2x strips of navy fabric (in this case 15cm wide) across the total width of my fabric. The bolt just happened to be 150cm wide, so two strips would cover both top, bottom and straps. 

I cut the strip to 82cm (since it is folded, I just needed to add seam allowance to one side, not both). At this stage, I thought I had taken a pic, but it appeared not :( Anyway, I marked halfway from the fold, and across the raw edge. This would become the self lined base.

I decided to further complicate the base to square off the corners. How could I do this?? Aha, I figured it out!!!


With the centre stitched, I folded the corners over and marked the depth of the corner. As it isn't very deep to start with (had I thought of this earlier, I would have made it wider - something to remember for next time!) so it was only 2.5cm from the end.


Mark both ends, both sides, and stitch from the sides to the centre stitching only.


It's a bit fiddly, but stick with me ;)


It will look like 4 separate little leaves. So hard to describe....


Trim the seams back, turn it through and you should get what looks like a boat-


From the other side - a self lined boxed corner. Amazing, hey?


On to the sides ;) I cut a matching lining piece from some curtain lining, with the fabric side out, rubbery side in.


I stitched the sides and the lining pieces into a tube. I also decided to reinforce the sides of the flag pieces, since it is so light weight.


Checking the finished width was 40cm, I stitched the sides to the base.


Then the lining to the other side...


This made the raw edges of the base fully enclosed by the sides. So far, so good!


I pressed the seams up, and ran a row of top stitching sound the bottom, for more support. Also, a row of stitching across the top to hold it all together. The flag itself frays really badly, so I tried to handle it as little as possible without stitching it.


Now for the top and straps!

Again, I cut it to 82cm and joined into a circle. Pressed the seams in and in half to make a jumbo binding.


There was enough leftover of the strips to use as the straps, so these got turned, pressed and top stitched. Finished width 4cm, but all the extra fabric did not get trimmed, but kept inside for extra support.


I considered putting the straps on the outside, but decided to put the inside, instead. 

So, I first stitched the binding piece to the front side if the bag, then positioned the straps on the inside and stitch in place. (No pic taken - I was getting excited that it was all working first time!)

Using loads of pins, I turned the facing to the wrong side, making sure the facing covers the existing stitching. From the front, I ran a row of stitching close to the seam, at this stage, avoiding the straps.


Another row of stitching added (could have included the strap at this stage, but didn't. If I was to do this again, I would stitch it down at this point)

Turn up the strap, and run a row of top stitching around the top, catching the straps down. 


Turn right side out, and we are done!!


Lots of technical stuff in this one, but if all seams are accurate, it should be a breeze ;)

25 November 2015

Flanged cushion tutorial

Having not being able to find an existing tutorial on a flanged style cushion - not with the flange on both sides, anyway - so I decided to do my own. It's really difficult to explain what I did with words, but hopefully the pics will give a better explanation....

So, here goes!

Firstly, let me start by saying that my front and back squares started at 52cm square, with the border strips at 7cm wide and about 70cm long (I didn't measure it exactly, as long as it's longer than the width of the front plus the border). The exact measurements aren't really relevant, unless you want to make an exact replica. ;) I allowed for a 1cm seam allowance on all pieces. Oh, and you'll need a zip. Longer is better, since you can trim it back if necessary.


I have here the front and back, plus 8 strips for the border edge (4x for the front, 4x for the back). You can see that these are wider than the base pieces. I didn't measure them exactly, since I was using scraps, but they are 7cm wide.

The zip will be inserted first in the seam at the bottom of the back piece. Firstly, I folded the front pieces in half and notched all the halfway points, and did the same on both sides of the border pieces. It's easier to do this first, and keeps it accurate.

I also marked the corner of the "Y" seams (which I should have done before the zip went in, but I forgot and had to unpick a bit later on). It is easier to set in the zip if it does not go to the seam edge, so I marked in from the edge, first 5cm, then I increased it to 6cm (which is why there are 2 marks). It was a bit of trial and error, and all measurements are what I thought would be best, but are not set in stone.... Stitch from the corner dot to the edge of the mark, on both sides.


Iron back the seam allowance, making it nice and crisp. 


This will make it easier to insert the zip. Since I will be top stitching around the seam once it is done, I needed the zip to be off centre. This means that the seams will not be the same on both sides of the zip. This is a little hard to explain.....

First, clip the seam at the mark, only on the side that will fold up. The other pieces will fold towards the border.


I pinned the zip in the position that I wanted, and used that as a guide as to where to stitch down. I want to stitch the covered side first, then the side that butted against the zip.


From the back, the distance that the stitching needs to be becomes more obvious. You can see the distance is about half way across the webbing of the zip. Once this has been determined, it can be pinned the whole length of the zip. The position of the zip pull is not important, a this stage, as it can be pushed right out of the way.


Using a zipper foot, I stitched close to the zipper teeth.


Then I did the same with the other side. This one worked out that the edge would match the edge of the webbing. Again I stitched close to the teeth with my machine zipper foot.


At this point, turn it over and double check that it sits nice and flat. I then stitched across the extra length of the zip a couple of times to secure it, and trimmed it off.


It was then time to top stitch the covered side. I started at the seam, over the zip and down the edge of the covered side and back to the centre. I used the open toe foot on my machine, but I could have used the zip foot if I wanted it to finish wider.... Stitch a section with the zip puller ahead of the foot, and then manoeuvre it under the foot with the needle down, and continue on.


Now that the zip is in, we can go ahead with the "Y" seams, or mitred corners.... ;)

Match up the notches made earlier with one side of a border strip and pin. Flatten out the piece and pin at either end. Stitch with the back piece facing up, so you can see the dots you made earlier. Continue with all sides of front and back pieces, starting and stopping at the dots. Make sure the underneath piece is out if the way when you back stitch.


Fold out the pice so that the border pieces are right sides together. Place a ruler on this fold and mark a line from the seam allowance to the edge. This will be the stitching line for the seam. 


Stitch all corners on the front and back pieces. Turn over and press flat. If it doesn't sit flat, it means that the angle was not accurate, and you can simply restitch at a steeper or shallower angle, as required. Make sure you unpick the unwanted row of stitching, or you won't get a flat seam.


Once you are happy with all the corners, trim back the seams, and press really well till they are nice and crisp.


You can now pin the front and back together and stitch all the way around. Don't forget to leave the zip open a bit so you can turn it through. :) Pin at the notches placed in the beginning, plus at the corners. Make sure the seams match, and pivot at this point when you get to the corner.

Trim the corners before turning right side out.


Now, you could stop here, if you want to. It would just be a big pillow with a small zip opening, but my plan was to stitch down the flanged edge, so once it was turned and I was happy with the corners, I pressed the seams flat and used LOTS of pins to keep it together at the seams. I worked from the back and planned to stitch in the ditch, but this isn't so easy when you can't see where you are stitching. Using the pins as a guide, I stitched as best I could in the ditch, or slightly on the main body, rather than the border strip. 


The final result is by no means perfect, but it looks pretty good to me ;)