Showing posts with label handmade. Show all posts

20 October 2013

Nearly there...

So close! But need a few things....

I'm thinking a gold belt, a pouch of some kind and maybe a necklace??


19 October 2013

Witchy progress...

After finding the perfect "hair", I woke up early and got it all attached. It looks like several strands of yarn, but is actually all attached in a spiderweb effect! Hard to describe, so here's a pic :


I tried a different way of attaching the hair, basically wrapping the ends in bias binding and stitch them on in rows. I planned ahead of time to make the back of her head black to hide the gaps in the yarn hair - big plus! Loving this angle that shows her eyelashes.... So cute!!


I also added her ruby slippers! I should have done them in fabric before I stitched the legs, but painting them in red then added glitter didn't go too badly.


She now also has a felt witchy hat. It needs a press and maybe some wire to hold its shape, but size wise it's good. The top was freehand cut, only because I was limited to an off-cut of felt I had on hand. It's shorter at the front and dips down at the back....


Now she just needs a tunic.... Do I go simple or set in sleeves?? Probably try simple first, and see what happens... 

13 October 2013

Halloween Witchy-poo...

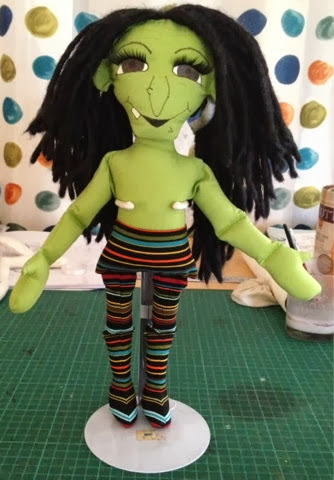
There has been a lot of talk on the forums lately on Halloween challenges - hats, witches, costumes, etc - so here is my take... So far, so good!

My witchy-poo is light hearted and happy. She has stripey legs and will, at some point, have painted shoes (like my puppy..) in red or black, and some kind if robe and hat. The hair piece is just a leftover strip from my "goth" girl, before I changed her entire face, but I will not use that wool because it leaves fluff everywhere!! Eyelashes are not yet attached, but I like the thicker version on her. She also has stitched wrists, elbows and knees and stitched in arms, so she is securely attached together. Just realised she doesn't have her highlights in her eyes! Will do that now!! Wondered why she wasn't sparkling... LOL!


Now, off to check my stash for something for her to wear! Oh, and some hair, of course....

19 September 2013

Something a little different...

A mermaid! My own interpretation, of course.....

More fishy than human, but that is the point! 


She has a fishy tail, fins and gills, so far. Her eyelashes are actually on upside down, because you couldn't see the jewels! LOL!! Still more work to do, but here she is still a work in progress...


31 August 2013

A change of clothes...

I was not loving the dress for puppy... I mean, it was OK, but not blowing my mind...

So, a rethink was in order! The design was fine - was it the colour? Tried again in a black floral, and with a few tweaks to the length an the collar, I think we have a winner!


I also removed the whiskers, since a comment made to me that it made her look more like a cat. I was unsure, but I do like it better. 


She also needed some shoes, so rather than make some, I painted them on. Easy peasy!!


Her pants have a hole for the tail to fit, and was made using my new favourite method - a rectangle! Super easy!!


Now, she needs a collar, but I think the mini buckle and ribbon will do for now, and I can now move on to another idea - this one could be a bit slippery.....


24 August 2013

Puppy's new duds...

Although I'm not sure I like the dress, at least she has something to wear! 

This is actually version 2.0. Not that the first dress failed, the collar just didn't sit right. It still doesn't, but it's better! Her pants have a slot in the back for the tail. I want to add some shoes and a bow, but that can happen later...


18 August 2013

Here Kitty, Kitty?!

What's better than one kitty?? Two kitties!!

Since I didn't pay that much attention when I made the first one, making another was always going to be a challenge! Goodness knows how many layers of paint I put on there....

So, it's same same, but different?? 


I think I've made the arms too fat and long, but they were already made, so they got used up!


I don't think Kylie will be too concerned, it is one-of-kind after all!!


30 June 2013

Puppy face mod...

Crisis over!! After many attempts at removing the black paint from the bear bodice, I FINALLY have a decent result! Phew.... No need to remake, thank goodness!!

I found the eyelashes I bought to try on the puppy face, and I think I like them! Not sure how they are supposed to be attached, but they come with glue, so maybe that is the way to go? I will live with it for a week and see how I feel...


16 June 2013

Puppy progress...

Gosh it's cold!! Yeah, I know... It IS Winter, but still... brrrrrrrrrrr.......

I had most of the puppy pieces cut out a couple of weeks ago, but had to focus on the bears, but today I couldn't wait any longer. The ears were the only thing left to cut out, but the pattern was done. 


I decided to set in the arms this time, and add a wrist. Not sure if I like it, the wrist that is, not the arms..


Major fault, though, painting the pads and spots after was a PAIN! I was going to make them washed out, like his face, but put the paint on too heavy and managed to smudge one paw! Grrrr...


Haven't washed off the blue pen yet or decided on clothes, but at least the main part is done!


Final point of note - DO NOT USE BLACK PAINT NEAR WHITE SATIN!! I was trying to get the stand that was holding the bride bear and she fell over into the paint! PANIC!! Straight under the tap she went, fingers crossed it comes off! What a completely stupid thing to do!!

Oh well, she's only going on the front of a Limo, right??

04 May 2013

Kitty's new clothes...

So, I toyed with some fabrics, and some styles, and decided she was not to wear a dress! It looked totally weird!! She is a tomboy (tomcat??) and so needed shorts of some kind.

Looked at denim, but it didn't work with the colour of the cat, but found some corduroy in the same range. Was going to bind it, but decided to fully line it instead. This made the finishing so much easier!

I added a pocket and a buttonhole for her tail to poke out, and left it a little on the large side. There is still something missing, perhaps a scarf or something?? For now, I'm calling her finished.....

UPDATED : I've added a bell around her neck! Now, she's done!!


Pussy cat, pussy cat, where have you been??

She's been to the sewing room, but still waiting on some clothes!!

How do you dress a cat/human hybrid?? I have no clue!! And so, she waits.....


28 April 2013

Same, same.... But different??

I've had an idea sloshing around my head from a couple of weeks now, involving the doll pattern with the 2 piece head.

Ears... Tails.... Animal heads?? Could it be done and actually look OK?? Many a sleepless night I spent thinking about it, till last night I did some preliminary drawings. I started with the usual domestic animals, cats and dogs, and went on to pigs and cows. I got a bit carried away, methinks....

I traced the same head shape as the boy, minus his ears, and drew the eyes in the same place, although I could move the angles and sizes, but the intent was a type of human/animal hybrid rather than "pure" animal. I quite liked the way the line drawings turned out, so today I took some fur pieces I bought at Doll Club and started experimenting!!

I toyed with the idea of just a single pieced head, but went ahead as I had done before separate back and front head pieces stitched up the side over the neck. Why change now, eh??

So, I found some matching coloured fabric, traced my lines and got painting. Tried a technique I modified from using "freezer paper" (not available here in Aus) and thought I would try using clear book covering. Was NOT successful!! It didn't stick as well as I had hoped it would. Back to the drawing board on that one.....

With the eyes a failure, I thought about redoing the face from scratch, but then I thought, why not just paint over it?? Use a pic of a tabby cats features as a guide and just started laying down paint!

As I suspected... Painting is NOT my strong suit!! Turned out OK, but not completely convinced....

In the end, the head is on, ears are on, it's now time for arms and legs!!


25 April 2013

Bridal bears - the Groom

I think I've mentioned before that I promised to dress some bears for my cousin who's getting married in September, but as yet had not been motivated. Can't put it off any longer, so here goes!!

I thought I had better start with the Groom, since his coat was going to be the most complicated part. But how??

Brainwave!! The bears are about the same size as a CPK, so I hunted through my patterns and found a basic shirt and pants, which fit perfectly!

Having not made a "proper" jacket since I was at TAFE, I got my old trusty reference book out and got to drafting the perfect coat with notched collar. I am not sure exactly what the groom is wearing, only "black suit and white shirt", so I've taken a lot if liberties with the style. Still deciding if pockets will be added, but that can be done later (I have a couple of months up my sleeve...)

As I decided that this will not be removable, and I have not neatened the internal seams, only those that will be seen. With this in mind, there was no point making a full bulky shirt, so I made a kind of "dickie" (fake front), which looks like its full but really isn't. To further help the illusion, I put a ring of white around the cuff of the coat. I used that same shirt pattern as the coat, only redrafted the collar and neckline. Still unsure of colours for his tie, but I'm sure the bride will tell me in time *fingers crossed*

Since I still need access to the shirt, I have not yet attached the buttons, but that will only take a short amount of time to complete when the time comes, so please excuse the pins holding them on!

The bride is next. I have a pic to go on for her, but that doesn't make her less of a challenge! I hate working with satin.... LOL!!


19 April 2013

Foster Children...

Not sure if I have already talked about these dolls, but I was trying to find a pic to show a friend the other day but couldn't (they were all on my computer!!) so I thought now would be as good a time as any to show some of the Foster Children I have made....

It all started when I bought a pattern from Sales Day at Doll Club. It was for a doll called a Foster Child Wee Tot, created by a lady called name Esther Lee Foster, around the same time as the CPK / Martha Nelson Thomas craze hit in the 80's. This version is 12" tall, and shows the "new" joints that were made available, the type with the plastic spigot and ring that lock into place. This was a whizz-bang new invention back in 1984! And, to top it off, this one had the new designed foot (whatever that meant..!)

Anyway, Esther Foster was also making soft sculpture dolls, as I mentioned, in the early 80's, in a 26" size, and using a method of fully sculpted faces with transfer eyes and wigs.

I tried one, and LOVED IT!! He was so cute! I used long fur to make his hair, but essentially, he was step-by-step from the book. Mum had some old style "dollskin" fabric, that made the job a breeze. I painted the eyes, and that was interesting, but turned out great. And even the "new style foot" turned out brilliantly, first time!! Right now, he stands proudly on my shelf, alongside my gollies and ET.


 I then discovered that the "dollskin" fabric that I had used was no longer available, so I started to experiment with different fabrics. I bought this piece of brown from Spotlight, which I think was a piece of suiting, and made my second.... She is so difficult to photograph, but is really gorgeous in real life!


So, of course, I loved the way the fabric worked, went back for more - discontinued! From there I had to experiment even more! I found a single knit in skin tone from KnitWit, and made my Grandmother a Dutch girl, complete with a little pair of clogs.....


The fabric worked OK, although a little hard to get definition in her little nose, so she is a bit piggy. I tried again, and ended up with this Indian girl, who I gave to a girl at work...


 Still a bit piggy, but better.

I discovered that the Foster Children pattern was also released as Elves. I HAD TO HAVE IT!! Found a copy on eBay, and discovered that, essentially, it was the same pattern, just with pointy ears and the "old foot". So I blended the 2 patterns together, to make the coloured fairy below....


Not sure at this stage if they are getting better or worse! The eyes always work, but the fabric just does not want to make a nice face..... time to have a rethink. I went back to KnitWit, and bought a whole bunch of rainbow colours, with the intention of making my own tribe of fairies! Here is my first attempt...


Not totally convinced, but he looks OK. But how about this guy??


A little creepy?? I think so. Such a rushed job to get him ready for the Canning Show, he is not my best work... Last but not least??


Soccer guy! Again, a rush job, and it shows!! I changed the ears on this one to be more normal rather than elvin, and they turned out quite well. Its just the rest that I am not happy with. 

I wonder if I just painted on the face without all the sculpting, I would be much happier with the final result?? The head shape is so beautiful when its stuffed, maybe that is the solution to the problem?? Hands and feet are fine, just that nose doesn't work for me anymore.

Back to the drawing board for this pattern. Its not forgotten, its just on temporary hiatus, until I can perfect the the perfect face.....