Showing posts with label Christmas. Show all posts

26 September 2015

Nutcracker, with a twist....

So, this other Nutcracker is a little darker, so his tunic needed to be a different colour. Not so bold and bright, more muted and winter-y. I found that orange and brown worked with his skin tone. As it happened I found a lot of these colours in my stash, including some fringe, which is a bit more pink but seems to work ok.

I also made his arms thinner, as the thicker wood plus the felt made them too fat. Still need to attach the legs, but here he is all mocked up....


As luck would have it, his hat is already the right colour, so no need to paint it. Need to spray his hands to match his head and glue all the bits on, but he should be done by the end of the weekend. 

Then on to the yellow one! ;) He is pretty much ready - he has been sitting like this for a while now, and I quite like it! I have run out of wood for his arms, though, so I need a quick trip to the hardware store..... Who am I kidding? It's never "quick"!! ;)


Update 28/9
I knocked off his nose and tore off some of his face paint. When will I learn?? :(

So, I had to strip back the colour back to nothing, but I only went as far as where the hair would be. I then reprimed and repainted it. Since it was already attached to the body (which was already completed) I had to tape it up really well to prevent overspray.

It's not too bad, but I have had to redo his face completely, so he looks a little different, but overall he is the same. Legs are done, too. I think I will leave them plain black.....


Update 2/10
He is done! I quite like this colour way, as it's a bit more neutral and exotic looking..... 


23 September 2015

Three little soldiers...

Aren't they looking good as a trio?


I think I know what everyone is getting for Christmas! ;)


I still have two in progress, so best get back to it! :) As you can see, I did end up adding his little beard. He looked a little unfinished without it......


01 August 2015

More Christmas recycling!

I'm on a recycled Christmas blitz! All the bits and pieces I have been hoarding are finally finding a use!!

Cue the unfinished items with big plans (lucky I still have a couple of months up my sleeve).

Just had the bathroom renovated, so no need to a shower curtain anymore. What do I do with all the rings? So far, a mini wreath, but I my also thinking dream catcher? This one is a bit of  red bias binding and some white ribbon, with a bell and a bow to top it off. I haven't finished this one yet, but it is very close. 


Next is this snowman variation. Before I painted the last one, I thought about glueing on some fleece. Not too successful, as you can see the red poking though, but once there is a face and buttons on, it should be ok. I can't remember what I used for the head, but the body is a milk bottle top. Maybe it's a coke bottle top? Not sure.....


Last year I made a gift out of cardboard and felt, I may make some more, but make them smaller. Maybe houses? Will have to see what happens...


So much inspiration at the moment, but not so much motivation. I'm gonna blame winter.... ;)

Christmas crafting, recycled style...

A cute little Snowman popped up on my FB feed using bottle tops. How could I resist giving it a go?? 
http://www.oneartsymama.com/2012/11/bottle-cap-snowman-ornaments.html

I had already started saving milk bottle tops for someone (can't remember now who?) and thought I could substitute with these instead. To get some variation in size, I used a milk bottle tops and the lid from a pasta sauce, but I also tried a coke bottle top. Another item I have been salvaging from the recycle bin are the used coffee pods, and thought this would make an awesome hat ;)

So, here is my interpretation of the Snowman. His head is a milk bottle top and his body is a lid from a glass jar. I painted it with my white spray sealer, first on the outside only, but went back and did the inside as well. I sealed it with some Mod Podge, and doubled up using it as the glue. I used some googly eyes and a faulty bead for his nose, some sequins for his mouth. Some beads make his buttons, although they look a little small... His scarf is made from felt, but I will raid my ribbon box next time.....


As a test, he isn't too bad. A few notes to remember, spray the backs FIRST, then the front, to stop the front being damaged. The head pin was causing the base to spin backwards when held up, so I used a bead to separate it a little from the rim of the lid, and used another between the "body" and "head" to give somewhere for the scarf to sit. I could use wire, to make it a bit softer? The hat has been deliberately placed at an angle, but could be straight on, if required. I could also glue two lids back-to-back, to give a more 3D effect, or even just his head?? May try that next time.... ;)

28 December 2014

Final stages! Yay!!

So, just waiting for the glue to dry, and I can put all the bits together! YAY!!

Learned a lot along the way. Firstly, spray paint goes bad. The red paint I used had been in the shed for quite some time, and had heaps of trouble getting an even coverage. The other colours were bought new and worked perfectly. I will try using coloured paper next time....

Secondly, do the face first. Since I started with the hat, and attached it, then had an issue with damage and had to redo it, I would definitely leave it till last. Trying to patch it up was not 100% successful. Also, trying to put the face on would be easier without the obstructions ;)

And here he is!! 


Close up of his torso and sleeves...


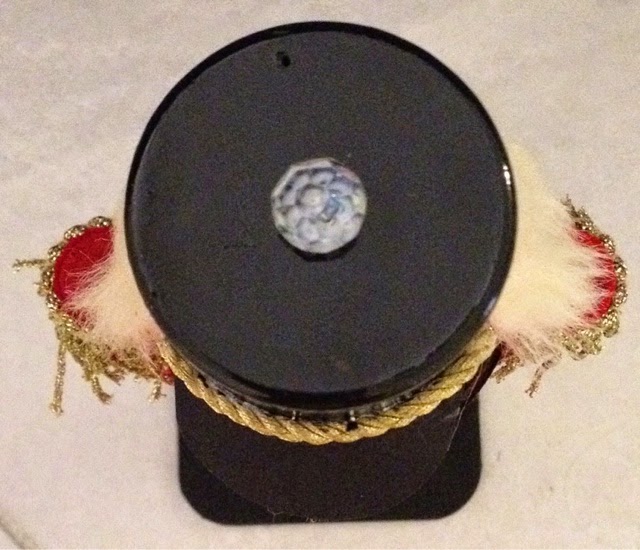
View from above...


From below... 


27 December 2014

Disaster strikes!!

I had a fail... :(  A BIG one....

His head fell over (since I haven't attached it to the body yet) and the bead on his hat came off with a bunch if paint. DISASTER!! Especially since everything else has been attached. I tried to just tape off the top and re spray, but the tape I used took off MORE PAINT!! O.M.G!! You can't be serious??

I had to scrape all the paint off and start again. More taping off, more primer, more paint, and I think I have succeeded...to a point. This will definitely be a keeper.

Anyway, I went back to Bunnings and got some rectangle pine to use for his boot. They may be a little long, but, as already mentioned, it's a keeper :)

He is not yet glued together, but I think he is progressing nicely...in spite of everything that has happened today.


I also redid a nose, so his face will be on tomorrow - once all the paint is fully dry. So, basically all the components are now done, and just need to be put together permanently. 

While researching the nutcracker, I came across this webpage of unusual versions, that is worth a look. 
https://historymaniacmegan.wordpress.com/2013/12/14/on-the-christmas-nutcracker/

26 December 2014

Nutcracker progress...

Having a bit of trouble with my spray painting. Not sure if it's technique or if the paint is bad, but I can't seem to stop the runs! 

I think I'm gonna cover the arms with felt to match his coat, but the legs will have to be painted. I have also bought a spray primer to try and stop the streaks from the brush. Not too sure it is any better, but I will give it another shot tomorrow. I haven't decided how long to make his legs yet, although I have bought a plain coaster as the base to screw it to ;) Loving the gold fringing, too. The girl at Spotlight laughed when I said I only needed 10cm. Why buy more than I need, right?? LOL!!


Having a dilemma over his nose, though. The foam piece I tried was not compressed enough to hold its shape (see below pic), so I need to rethink what I'm going to use instead. I have, however, got the rest of the face sorted. 


And, his hair is on and his hands are painted, so he is progressing pretty well, I think. Just more painting a glueing tomorrow, and we should be done! Then I can get back to my minions.... :)

24 December 2014

Merry Christmas!!

Ho ho ho!! Tis that time of year again. Feels like just another stinkin' hot Summer day here in Oz....

I have 4 minions half done, waiting on clothes and hair, but legs and eyes are done ;) Unfortunately,  I have been a little distracted....


... with this guy. He is half done, but you get the idea.....


I thought about how to do a nutcracker for a while now, and the minion shape was not going work with the curved top. How could I change up the shape, and not have to spend any money? A plastic cup, of course! And, as luck would have it, it fits perfectly at the ridge! OMG! How lucky is that??? And a plastic bottle lid made into a hat. Perfect!!


Once again, I have turned my tin upside down, to assist with the flat base for the top, and easy access for the legs through the lid. I plan on using the same technique as the minion legs for this, screwed in from the top, but also attached to a base for stability.

I need to buy some heavier dowell to use for arms and legs, but so far, not a cent spent! Love that, and it's almost all recycled... To be continued....

08 November 2014

Prizes!!

The Canning Show has been and gone, but I did come away with a couple of prizes. 😊


My "quilt" from last year became a "wall hanging" this year and picked up a highly commended.


My Dutch quilt came third against the one above. I'm surprised, since I thought the other had more impact. 


These guys also came second in the Christmas category.


And lastly, Dorothy and the gang came second in the Recycled section.

I also put in my Witch and pink baby wrap/doll quilt, but they didn't score a prize. No matter, there's always next year. Better get cracking!! 😄


11 January 2014

Frosty the Snowman...

I know, I know... Christmas is over, but while I'm still playing with the coffee tins, there HAS to be a snowman! 


He is a slight change of style. His stick arms are painted and coated in nail varnish, and covered with a little snow. :) The body is quilt batting, with one layer at the top and two layers at the bottom, to give some shape. It is then just "sculpted" with scissors to round it off a bit. He wears a scarf and top hat, made from a lid from a spray bottle. It is felted on the crown but only painted an the brim - didn't see the need for felt on both! His face is beads and sequins, and although I didn't have any orange felt for his carrot nose, I think the yellow is close enough - for now...

I used white stretch for his head but used two layers, as it was only single knit and the colour from the ball would have shown through. I also gave him some hair from the quilt batting, although it could have been left off, but it was already glued before I changed my mind! No matter, it makes his hat fit better!! LOL!

Side angles below :


03 January 2014

A trio of Angels - does that make a choir??

I am out of ideas! For Angels, that is.....

I now have 3, so I suppose that could be considered a choir? All different materials but all, essentially, white. I think I'm ready for some colours again!!


The final angel was using some white lace, gathered at the top and "bust" level. She has sheer sleeves with no other embellishment, other than a white ribbon around the gathers. I have no idea what my measurements were, but it is very full! Matching white ribbon in her ponies breaks up the beige-ness.


On another note, I added some sequins to the outside edge of the golden haired angel, for a little bit if bling....


01 January 2014

A change of face...

So, I was not happy with the last Angels head. It was a bit bland, so I made a new one!!

Slight change to the eyes, also, and I have not yet decided if she will have rosy cheeks or not. If so, what colour to use? I don't think pink would be appropriate...


Much happier with this, and I love her funky red hair!!

I also redid the sleeve on the first Angel for several reasons. First, they were too flimsy. I only used one layer of card - 2 layer work so much better! Secondly, I used the knit fabric from the head, which was not working right, either. No matter! I just undid them and made new ones! :)


It still needs "something" but it's heaps better... I wonder if sequins will work?? Now which box did I put them in....... Or maybe I can overlay the lace?? Experiments are needed... ;)

29 December 2013

Another Angel...

Slightly different to the last one.... I found a strip of white and silver tulle, which I cut in half, and used for both the top and skirt of this Angel. I also added a sleeve to the arm, with hands in matching felt to the head.

I stitched the skirt and trim with machine, and glued onto the tin after. I think it worked pretty well! I did the skirt first, then decided how to do the top, and ended up unpicking the skirt and doing it again. I would use better quality felt for the base next time, as this one was a little thin...


Now that this one is done, she is a little dull... How can I add some pizazz??


Crochet edges...

I saw on a website recently a felt circle with a crochet edge, reminding me of the boxes that people used to make out of cardboard that were crocheted together.  The just use trebles - like granny squares - and I used this idea to go around the circle.


I had some Christmas paper, cut out a circle, attached it to cardboard, punched out some holes and off I went!


I need to make it smaller, and perhaps add some plastic over the top. I could then use photos or other pictures printed out - anything that I could glue!!

For this size, I used 6x trebles in each hole for the first round, then 5x trebles and 2x doubles to create the "dips". Worked out OK, but curls up a bit. Perhaps some spray starch will fix that? My yarn is quite slippery, so maybe that is a factor?? I'm not that comfortable with crochet, but I can make coat hangers, and that's about it... ;)

I wonder if I could make some Christmas decorations for next year?? Only 360 days to go!!

26 December 2013

Sing, choirs of Angels...

The plan is a bunch of angels, singing their little hearts out....

The first one is done, now I just need a couple more to make the choir!


I don't like the arms on this one, and I tried to use normal fabric as the base instead of felt, with limited  success. It was too transparent, and even after 2 layers of white paint on the tin, you can still see the design of the tin through it, hence the layers of lace covering it up......

I do, however, like the book and how it slots into the hand.  This one was made from felt and it's a little thick. I now have some black card stock to use that is lighter and thinner, and so should look better.

I am thinking the next one will use tulle stitched onto the felt before it's applied to the tin. This one was glued and it's hard to get the gathers to sit nicely.  I had to cover the join with ribbon, which is now hidden under the extra lace I had to use to cover over a glue mark right at the front! Grrr! I was going to leave it as per below, but it didn't have any zing, and I found the silver lace in my stash already.....


The wings are purchased - pack of 6 for $2! What a great deal!! They are perhaps a tad smaller than I would like, but cheap and cheerful is fine by me. I think I have only had to buy the balls for the head (I think $3 for about 30 balls), the wings and a couple of colours of felt I didn't have (or used up....) They do packs of 3 colours at Spotlight for $1.50, or single pieces for $1. Total so far, not much at all!! Fabric I had, tins I had, paint, wool and felt I had. Oh, the split pins I bought, too, but it's a box of 100, so will last for a while yet. 

Overall, I'm liking this concept! Will try a boy also, with top hat and tails. I have 40+ tins still available to play with, so failure is no problem! Just grab another one and try again... ;)

22 December 2013

Santas got himself an Elf!

I thought Santa needed a friend, so I made him an Elf! I took pics if my process, if you want to make your own. I drew all the parts freehand to fit my tin, so I have not provided a pattern only the process...


Firstly, I needed inspiration. Again, I turned to Google images and found a pic for inspiration, then made some doodles in my book...... 
I cut a rectangle big enough the cover my tin, so I could draw on some guide lines.
I then made some arms and legs patterns. I decided to joint the arms this time, so they needed to be designed completely differently. This is what I came up with :
I cut one set out of cardboard to test if it's heavy enough, since the last one was a different weight. Happy with the proportions, I used these as the template to cut the other pair.
Happy with this, it's time to start glueing!

Remember that paper pattern? I cut out the green felt, and laid it over the red strip I cut a strip wide enough so the front would be covered. I could have shaped it, but, as it turned out, the ridge it created made a really nice waistline! 
For the belt, I cut a square from some craft foam I had from another project for the buckle, threaded through some ribbon and voila!
The legs were to have striped stockings, so I used some woven stripe from my stash, and pressed some heavy stabiliser to it. This created a firm base to glue, plus helps to prevent fraying. I did the stockings first, then the shoes and pants afterwards. I painted the cardboard in white prevent the coloured side showing through the white. 2 coats where the stripe was, one over the rest...
Test fit on the tin - love it!!
Face time!!
I made my head sock out if different fabric, but it works just as well! Also used a different neck, this time some retic tube that was in the shed! Sweet!! More stuff I already had!!
I cut a very small hole in the lid this time, just big enough for it to fit through. It keeps it nice and tight, so it can be cable tied on permanently later on....
Face based on the Elf on a Shelf :
You can see I also I drafted a little ear, for later...
Face painted!!
Also needed a spiked collar. I used the lid as a base, marked eights, and ended up with this:
Completed, it looks like this :
Looking good! How about some hair?? This is my method....
Cut a rectangle big enough to cover the area, pin at the seam, plus at the front and back :
Then it's just a case of pinching up the darts. Trim them down, and pin in place. The front is the tricky part! I just snipped until I liked the shape, trimmed around the back, glued it on. Don't get me wrong, it takes some time to get it right! But if you have a plan in how you want it to look, otherwise you could snip off something you wanted to keep...
And those ears from earlier??
So, put it all together, punch the holes for the arms and legs and push through the pins. I like to open the pin slightly before I put it through because I am opening them by feel, and sometimes can't get them open once my hand is squeezed into the tin! 
Thread up the neck through the collar, neck and lid. I haven't secured this one yet, as it can't put my fingers on the cable ties!
I also added a hat and some buttons for the front.